Audio Workshop 9
Simple Delay
You can apply real-time effects using the design tool. In this tutorial, we’ll try the delay object.
Design the Audio System
We will add an adjustable delay between the microphone input and the headset.
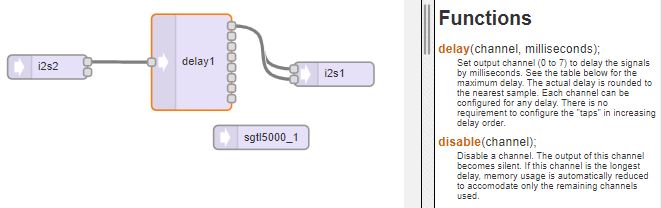
Draw the system shown below.
When drawing this system, be careful to use delay, not delayExt. The delayExt object uses an external RAM chip that optionally can be added to the bottom of the Audio Adapter.
The delay object has 1 input and 8 separate delay taps that can be used. We will use just one in this example.
Turn the Design into Code and Use it in a Program
You can copy and paste the code below into an IDE window. Don’t use the example in the IDE as we have deviated from that setup.
// Advanced Microcontroller-based Audio Workshop
//
// http://www.pjrc.com/store/audio_tutorial_kit.html
// https://hackaday.io/project/8292-microcontroller-audio-workshop-had-supercon-2015
//
// Part 2-5: Simple Delay
// ProtoSupplies.com Changes and Additions:
//    Simplified design to make easier to understand.


///////////////////////////////////
// copy the Design Tool code here
///////////////////////////////////


//===============================================================================
//  Initialization
//===============================================================================
void setup() {
  Serial.begin(9600);
  AudioMemory(160);
  sgtl5000_1.enable();
  sgtl5000_1.volume(0.6);
  sgtl5000_1.inputSelect(AUDIO_INPUT_MIC);
  sgtl5000_1.micGain(36);
  delay1.delay(0, 400);
  delay(1000);
}
//===============================================================================
//  Main
//===============================================================================
void loop() {
  // do nothing
}
Now Export and copy and paste the Design Tool code into the program to complete it and verify and upload the program to the Teensy.
Now when you tap on the microphone or speak into it, you will hear the sound noticeably delayed.
Closer Look at Audio Memory
Until now, we have ignored the AudioMemory() line in the setup() function of our examples. AudioMemory() allocates all of the memory the Teensy Audio Library uses. The number you give to AudioMemory() is the total number of 128 sample buffers. Normally very little memory is required so 10 to 20 buffers are usually plenty. Each buffer consumes 260 bytes of Teensy’s RAM. You can see the impact of allocating more memory in Arduino’s console window.
Using delay() uses memory to temporarily store the data. The longer the delay, the more memory it consumes.
Modifying the Delay Time
In setup() the delay tap 0 that we are using is set for an output delay of 400 millisecond. Try changing this parameter to hear a longer delay such as 800ms.
You may notice that the background noise heard in the headset is is now being chopped up as it runs out of the available memory to store the complete 800 millisecond length of audio data and tapping or speaking into the microphone no longer works as you expect. With a delay of twice as long, try doubling the AudioMemory() to 320 to see if that corrects the issue.
Next up, we’ll take a look at using feedback with the delay object to create an echo effect.