Audio Workshop 10
Feedback (Echo) Delay
Most audio systems connect all their wires in forward (left to right) direction. However, backward feedback (right to left) wires are possible, especially to turn a delay into a repeating echo.
Design the Audio System
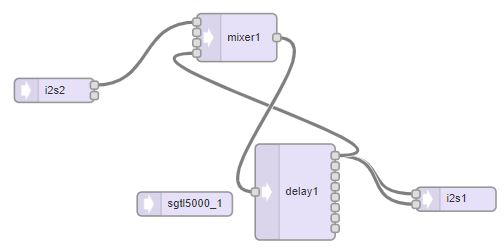
In this example, we’ll use a mixer to provide a feedback path for the delay. The mixer passes the audio to the delay which delays it by 400ms. The audio is then sent to the headphones and is also passed back to the mixer where it is then fed back into the delay again. The gain on the mixer will determine how quickly the audio fades with each echo.
Draw the system below.
Turn the Design into Code and Use it in a Program
Copy and paste the code below into an IDE window. There are only minor pin number changes from the Part_2_06_Feedback_Delay example in the IDE.
// Advanced Microcontroller-based Audio Workshop
//
// http://www.pjrc.com/store/audio_tutorial_kit.html
// https://hackaday.io/project/8292-microcontroller-audio-workshop-had-supercon-2015
//
// Part 2-6: Feedback (Echo) Delay
// ProtoSupplies.com Changes and Additions
//    Change pin #'s to match tutorial adapter


///////////////////////////////////
// copy the Design Tool code here
///////////////////////////////////


#include <Bounce.h>

Bounce button0 = Bounce(3, 5);
//===============================================================================
//  Initialization
//===============================================================================
void setup() {
  Serial.begin(9600);
  pinMode(3, INPUT_PULLUP);
  AudioMemory(160);
  sgtl5000_1.enable();
  sgtl5000_1.volume(0.55);
  sgtl5000_1.inputSelect(AUDIO_INPUT_MIC);
  sgtl5000_1.micGain(36);
  mixer1.gain(0, 0.5);
  mixer1.gain(3, 0.7);
  delay1.delay(0, 400);
  delay(1000);
}
//===============================================================================
//  Main
//===============================================================================
void loop() {
  // uncomment for VR2/A3 knob to control the feedback level
  /*
  int knob = analogRead(A3);
  float feedback = (float)knob / 1050.0;
  mixer1.gain(3, feedback);
  */

  // uncomment for button0 to double the feedback (allowing unstable)
  /*
  button0.update();
  if (button0.read() == LOW) {
    mixer1.gain(3, feedback * 2.0);
  }
  */
}
Now Export and copy and paste the Design Tool code into the program to complete it and verify and upload the program to the Teensy.
Now when you run the example, you’ll clearly hear a repeating echo that gradually diminishes. The amount of feedback at channel 3 on mixer1 controls how much weaker the signal becomes each time it echoes, which in turn affects the number of echoes heard.
mixer1.gain(3, 0.7);
Experiment with Different Feedback Gain
Uncomment the two blocks of code in loop(). The first part allows the VR2/A3 knob to adjust the feedback level. If you turn the knob all the way up (clockwise), the feedback will be very close to 1.0. Each time the sound circulates back through the loop, it is reduced only slightly, so it keeps echoing for a very long time. If it is rotated all the way down, the echo goes away completely.
  // uncomment for VR2/A3 knob to control the feedback level

  int knob = analogRead(A3);
  float feedback = (float)knob / 1050.0;
  mixer1.gain(3, feedback);
Unstable Feedback Loops
Feedback signals are risky if the total signal gain around the loop is ever more than 1.0. If the signal becomes stronger each time it travels around the loop, it will grow without bound, until clipping. This is called an unstable feedback loop.
To experiment with an unstable loop, press and hold the left button (BTN0) to double the feedback. If the knob is turned up past halfway, the result is an unstable loop.
  // uncomment for button0 to double the feedback (allowing unstable)

  button0.update();
  if (button0.read() == LOW) {
    mixer1.gain(3, feedback * 2.0);
  }
In natural echo, the sound decreases but also changes as it echoes. You can create a similar effect by adding a filter object in the feedback path. Each pass around the loop will decrease the signal and also decreases its high frequencies even more, to achieve a very natural echo effect. Combinations of looped delay (a loop within the loop) can create rich reverb effects.
In the next tutorial we’ll take a look at basic filters for attenuating a portion of the audio spectrum.