Audio Workshop 7
Playing Samples (Short Sound Clips)
The previous tutorials showed how to play WAV files from a SD card. This tutorial will take a look at playing sounds directly from a program.
For very short sounds (short as in don’t take up too much memory), the sound data can be placed directly into your program. Playing sounds from the Teensy’s memory has 2 main advantages:
- It’s much more efficient, allowing dozens of sounds to play simultaneously without reaching the microcontroller resource limits.
- The SD card isn’t needed.
Design the Audio System
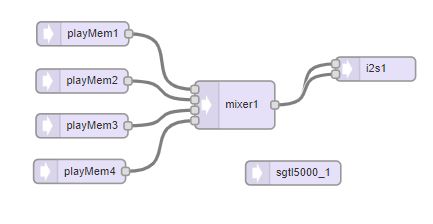
Draw this simple 4 sound player shown below, using playMem objects.
This system uses a connection type we haven’t seen before, where 1 object connects to 2 others. This is perfectly fine when 1 output transmits to 2 or more inputs. In this case we are feeding both left and right i2s1 inputs with the same audio output since our sources have only 1 channel (mono) but our headphones are stereo and we want to hear the audio in both ears.
Keep in mind however, that you can’t connect 2 signals to the same input. To feed more than 1 signal to any input, you must use mixers to combine them, which is exactly what this system does for the 4 playMem objects.
Turn the Design into Code and Use it in a Program
Unlike our previous examples, we are going to use the example program “Part_2_03_Samples” from the examples in the IDE . Go to File > Examples > Audio > Tutorial > Part_2_03_Samples to open.
You’ll notice that the program has multiple tabs in addition to the main program which contain the sound data. That is why we are using the example from the IDE rather than rolling our own.
Once the program is open, we will need to manually change the buttons from pins 0-2 to 3-5 as we did in the other examples as shown here because we will make use of them in this tutorial. We are not going to worry about initializing the LCD because we aren’t using the SD card in this example so there is no potential for conflict. It will just display a boring blank white screen.
// Bounce objects to read pushbuttons
Bounce button0 = Bounce(3, 15);
Bounce button1 = Bounce(4, 15);  // 15 ms debounce time
Bounce button2 = Bounce(5, 15);

void setup() {
  pinMode(3, INPUT_PULLUP);
  pinMode(4, INPUT_PULLUP);
  pinMode(5, INPUT_PULLUP);
Now Export and copy & paste the code into the program in the usual place and verify and upload the completed program to the Teensy.
Tapping the 3 pushbuttons will now play drum and cymbal sounds.
Doing More Sounds
Near the end of loop() you will find more complex code that is commented out which allows the 3 pushbuttons to play 6 sounds depending on the position of the VR2/A3 knob. Uncomment this code and upload the revised the program.
  int knob = analogRead(A3);
  if (button0.fallingEdge()) {
    if (knob < 512) {
      playMem1.play(AudioSampleSnare);
    } else {
      playMem1.play(AudioSampleKick);
    }
  }
  if (button1.fallingEdge()) {
    if (knob < 512) {
      playMem2.play(AudioSampleTomtom);
    } else {
      playMem4.play(AudioSampleGong);
    }
  }
  if (button2.fallingEdge()) {
    if (knob < 512) {
      playMem3.play(AudioSampleHihat);
    } else {
      playMem3.play(AudioSampleCashregister);
    }
  }
The gong and cash register sounds play for longer times. If you look at the code, the center pushbutton uses playMem2 in one case and playMem4 in the other. If you tap and turn quickly, can you get all 4 playMem objects making sound at the same moment?
While frantically tapping buttons, you might consider the mixer gain settings in this example which are set to 40%. If all 4 sounds simultaneously produce a full 1.0 amplitude signal on the mixer inputs, we could end up with a sum to 1.6, which could cause clipping and massive harmonic distortion.
  mixer1.gain(0, 0.4);
  mixer1.gain(1, 0.4);
  mixer1.gain(2, 0.4);
  mixer1.gain(3, 0.4);
Can you notice any distortion by listening as you press all 3 pushbuttons together? How about while the gong still rings? Odds are any distortion will be extremely difficult to hear in this scenario.
If you have a strong background in software or engineering, you may be accustomed to rules based on solid mathematical principles. Try adjusting and experimenting with the gain settings, perhaps set the gains to 0.9 and upload. Even with all 4 sounds able to add to 3.6, the louder output may still sound better or more dramatic, even with some distortion possibly occurring.
Audio design tends to be very subjective. Experimenting and listening is the best way to learn.
In this workshop example, 6 sound examples were provided as additional files. As you can see in the comments, these extra files are created by a program called “wav2sketch”. This is a command line utility which must be run from a Terminal (Mac, Linux) or Command Prompt (Windows). For more information on using this utility, click on the playMem object in the Design Tool and read the info in the right pane
You can find the wave2sketch software on Github: https://github.com/PaulStoffregen/Audio/tree/master/extras/wav2sketch
Next we’ll take a look at using a microphone input.