Audio Workshop 11
Filters
Filters allow a portion of the audio spectrum to pass, while reducing the rest. The simplest filter to use in the Teensy Audio library is the state variable filter, labeled simply filter in the “filter” section. In this part, you will listen to filtered music, to hear the effect of each type of filtering.
Design the Audio System
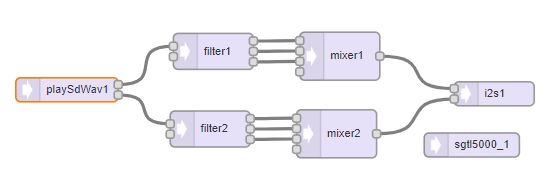
This system will play a WAV music file from the SD card and pass it through a filter on both the left and right channel. The filters have 3 outputs which are low pass, band pass and high pass filters.
The mixers used in this system are acting as signal routing switches. One channel will be set to 1.0 gain, to pass the signal straight through so we can hear the effect of the filter. The other mixer channels will be set to zero to block those signals. the mixers won’t actually be doing any “mixing”, just routing one of the filters outputs.
Draw the audio system below in the Design Tool.
Turn the Design into Code and Use it in a Program
Copy and paste the code below into the IDE window. Compared to the original Part_2_07_Filters example in the IDE, we have updated the pin numbers and initialized the LCD to avoid conflict since we are again using the SD card on the Audio Adapter.
// Advanced Microcontroller-based Audio Workshop
//
// http://www.pjrc.com/store/audio_tutorial_kit.html
// https://hackaday.io/project/8292-microcontroller-audio-workshop-had-supercon-2015
//
// Part 2-7: Filters
// ProtoSupplies.com Changes and Additions
//    Change pin #'s to match tutorial adapter
//    Initialize, but don't use LCD in this example
//
#include <ILI9341_t3.h>
#include <font_Arial.h>
#include <XPT2046_Touchscreen.h>
#include <Bounce.h>


///////////////////////////////////
// copy the Design Tool code here
///////////////////////////////////


// Use these with the Teensy Audio Shield
#define SDCARD_CS_PIN    10
#define SDCARD_MOSI_PIN  7
#define SDCARD_SCK_PIN   14

// Use these with the Teensy 4.1 SD card
//#define SDCARD_CS_PIN    BUILTIN_SDCARD
//#define SDCARD_MOSI_PIN  11  // not actually used
//#define SDCARD_SCK_PIN   13  // not actually used

// LCD control pins defined by baseboard
#define TFT_CS 40
#define TFT_DC  9

// Use main SPI bus MOSI=11, MISO=12, SCK=13 with different control pins
ILI9341_t3 tft = ILI9341_t3(TFT_CS, TFT_DC);

// Touch screen control pins defined by baseboard
// TIRQ interrupt if used is on pin 2
#define TS_CS  41
//#define TIRQ_PIN  2
XPT2046_Touchscreen ts(TS_CS);  // Param 2 = NULL - No interrupts

// Bounce objects to read pushbuttons
Bounce button0 = Bounce(3, 15);
Bounce button1 = Bounce(4, 15);  // 15 ms debounce time
Bounce button2 = Bounce(5, 15);
//===============================================================================
//  Initialization
//===============================================================================
void setup() {
  pinMode(3, INPUT_PULLUP);
  pinMode(4, INPUT_PULLUP);
  pinMode(5, INPUT_PULLUP);

  // Setup LCD screen
  tft.begin();
  tft.setRotation(3);
  ts.begin();
  ts.setRotation(1);
  tft.fillScreen(ILI9341_BLUE);

  Serial.begin(9600);
  AudioMemory(12);
  sgtl5000_1.enable();
  sgtl5000_1.volume(0.5);
  SPI.setMOSI(SDCARD_MOSI_PIN);
  SPI.setSCK(SDCARD_SCK_PIN);
  if (!(SD.begin(SDCARD_CS_PIN))) {
    while (1) {
      Serial.println("Unable to access the SD card");
      delay(500);
    }
  }
  mixer1.gain(0, 0.0);
  mixer1.gain(1, 1.0);  // default to hearing band-pass signal
  mixer1.gain(2, 0.0);
  mixer1.gain(3, 0.0);
  mixer2.gain(0, 0.0);
  mixer2.gain(1, 1.0);
  mixer2.gain(2, 0.0);
  mixer2.gain(3, 0.0);
  delay(1000);
}
//===============================================================================
//  Main
//==============================================================================
void loop() {
  if (playSdWav1.isPlaying() == false) {
    Serial.println("Start playing");
    playSdWav1.play("SDTEST3.WAV");
    delay(10); // wait for library to parse WAV info
  }

  // Update all the button objects
  button0.update();
  button1.update();
  button2.update();

  if (button0.fallingEdge()) {
    Serial.println("Low Pass Signal");
    mixer1.gain(0, 1.0);  // hear low-pass signal
    mixer1.gain(1, 0.0);
    mixer1.gain(2, 0.0);
    mixer2.gain(0, 1.0);
    mixer2.gain(1, 0.0);
    mixer2.gain(2, 0.0);
  }
  if (button1.fallingEdge()) {
    Serial.println("Band Pass Signal");
    mixer1.gain(0, 0.0);
    mixer1.gain(1, 1.0);  // hear band-pass signal
    mixer1.gain(2, 0.0);
    mixer2.gain(0, 0.0);
    mixer2.gain(1, 1.0);
    mixer2.gain(2, 0.0);
  }
  if (button2.fallingEdge()) {
    Serial.println("High Pass Signal");
    mixer1.gain(0, 0.0);
    mixer1.gain(1, 0.0);
    mixer1.gain(2, 1.0);  // hear high-pass signal
    mixer2.gain(0, 0.0);
    mixer2.gain(1, 0.0);
    mixer2.gain(2, 1.0);
  }

  // read the knob and adjust the filter frequency
  int knob = analogRead(A3);
  // quick and dirty equation for exp scale frequency adjust
  float freq =  expf((float)knob / 150.0) * 10.0 + 80.0;
  filter1.frequency(freq);
  filter2.frequency(freq);
  Serial.print("frequency = ");
  Serial.println(freq);
  delay(200);
}
Now Export and copy and paste the Design Tool code into the program to complete it and verify and upload the program to the Teensy.
The example program uses the 3 pushbuttons to reconfigure the mixers.
- BTN0 = Low Pass filter – Passes lower frequencies, attenuates higher frequencies
- BTN1 = Band Pass filter – Passes middle band of frequencies, attenuates high & low frequencies
- BTN2 = High Pass filter – Passes higher frequencies, attenuates lower frequencies
The VR2/A3 pot to allow you to vary the filter frequency as the music plays. The Serial Monitor window will show the actual frequency setting as you turn the knob. On all 3 filters, the music will seem to get quieter as you filter away more of its spectrum.
For example, if you have the low pass filter enabled and set the knob to a frequency of 200, only frequencies of 200Hz or less will be passed through to the headphones.
You may have noticed that the filter objects have 2 inputs. The second input allows another audio signal to vary the filter frequency automatically. Details and functions to tune parameters can be found in the design tool documentation. Strange effects can be achieved by using an oscillator to “sweep” the filter frequency rapidly.
Next up, we’ll take a look at synthesizing sounds on-the-fly.