Audio Workshop 3
Blink LED While Playing Music
The previous tutorial just streamed the audio data from the SD card to the sgtl5000 audio chip on the Teensy Audio Adapter uninterrupted. Real applications generally need to be doing other stuff while this is going on.
To prove we can pat our head and rub our tummy at the same time, we will blink the LED while playing music.
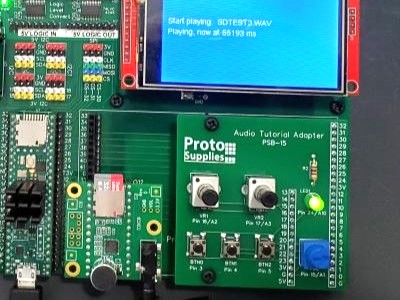
We will also send the file position data out to the Serial Monitor window and because we have an LCD, we may as well show the file position data on the LCD as well.
Copy and download the program below.
The important thing to note is that even though the program uses delay() to control the blinking of the LED and is also doing frequent serial prints out to the Serial Monitor window and updating the LCD, the audio library keeps the audio playing completely uninterrupted through it all.
Complete Program
// Advanced Microcontroller-based Audio Workshop
//
// Part 1-4: Blink LED while Playing Music
//
// Do something while playing a music file.  Admittedly
// only blink the LED and print info about the
// playing time in the file.  The point is that Arduino
// sketch code is free to do other work while the audio
// library streams data from the SD card to the headphones.
//
//  ProtoSupplies.com Changes and Additions:
//    Change pin #s to match tutorial adapter to avoid conflicts
//    Add Touch LCD support
//    Show WAV file playing on LCD as well as file position data

#include <ILI9341_t3.h>
#include <font_Arial.h>
#include <XPT2046_Touchscreen.h>
#include <Audio.h>
#include <Wire.h>
#include <SPI.h>
#include <SD.h>
#include <SerialFlash.h>

AudioPlaySdWav           playSdWav1;
AudioOutputI2S           audioOutput;
AudioConnection          patchCord1(playSdWav1, 0, audioOutput, 0);
AudioConnection          patchCord2(playSdWav1, 1, audioOutput, 1);
AudioControlSGTL5000     sgtl5000_1;

// Use these with the Teensy Audio Shield
#define SDCARD_CS_PIN    10
#define SDCARD_MOSI_PIN  7
#define SDCARD_SCK_PIN   14

// Use these with the Teensy 4.1 SD card
//#define SDCARD_CS_PIN    BUILTIN_SDCARD
//#define SDCARD_MOSI_PIN  11  // not actually used
//#define SDCARD_SCK_PIN   13  // not actually used

// touchscreen offset for four corners
#define TS_MINX 400
#define TS_MINY 400
#define TS_MAXX 3879
#define TS_MAXY 3843

// LCD control pins defined by board
#define TFT_CS 40
#define TFT_DC  9

// Use main SPI bus MOSI=11, MISO=12, SCK=13 with different control pins
ILI9341_t3 tft = ILI9341_t3(TFT_CS, TFT_DC);

// Touch screen control pins defined by board
// TIRQ interrupt if used is on pin 2
#define TS_CS  41
//#define TIRQ_PIN  2
XPT2046_Touchscreen ts(TS_CS);  // Param 2 = NULL - No interrupts
//===============================================================================
//  Initialization
//===============================================================================
void setup() {
  Serial.begin(9600);

  // Setup LCD screen
  tft.begin();
  tft.setRotation(3);
  ts.begin();
  ts.setRotation(1);
  tft.fillScreen(ILI9341_BLUE);

  AudioMemory(8);
  sgtl5000_1.enable();
  sgtl5000_1.volume(0.45);
  SPI.setMOSI(SDCARD_MOSI_PIN);
  SPI.setSCK(SDCARD_SCK_PIN);
  if (!(SD.begin(SDCARD_CS_PIN))) {
    while (1) {
      Serial.println("Unable to access the SD card");
      delay(500);
    }
  }
  pinMode(24, OUTPUT); // LED on pin 24
  delay(1000);
}
//===============================================================================
//  Main
//===============================================================================
void loop() {
  if (playSdWav1.isPlaying() == false) {
    Serial.println("Start playing");
    playSdWav1.play("SDTEST3.WAV");
    delay(10); // wait for library to parse WAV info
    tft.setCursor(10, 120);
    tft.setFont(Arial_10);
    tft.println("Start playing:  SDTEST3.WAV");
  }

  // print the play time offset
  Serial.print("Playing, now at ");
  Serial.print(playSdWav1.positionMillis());
  Serial.println(" ms");
  tft.setCursor(10, 140);
  tft.print("Playing, now at ");
  tft.fillRect(110, 140, 150, 160, ILI9341_BLUE); // Clear previous value
  tft.setCursor(110, 140);
  tft.print(playSdWav1.positionMillis());
  tft.println(" ms");

  // blink LED and print info while playing
  digitalWrite(24, HIGH);
  delay(250);
  digitalWrite(24, LOW);
  delay(250);

  // read the VOL knob position (analog input A1)
  int knob = analogRead(A1);
  float vol = (float)knob / 1280.0;
  sgtl5000_1.volume(vol);
  Serial.print("volume = ");
  Serial.println(vol);
}
But Delay() Can Still Bite Us
This code at the end of the program implements volume control using the VOL potentiometer on the Audio Tutorial Adapter.
  // read the VOL knob position (analog input A1)
  int knob = analogRead(A1);
  float vol = (float)knob / 1280.0;
  sgtl5000_1.volume(vol);
  Serial.print("volume = ");
  Serial.println(vol);
If you adjust the volume control quickly, you will notice that there is a slight delay between the adjustment and the volume actually changing.
This is caused by the delay() used for blinking the LED. While it doesn’t affect the audio library, it does delay responding to user actions like twiddling a volume knob.
The next tutorial will look into ways to prevent this issue.