XH-M452 Dual Temperature & Humidity Control Module
$13.95
Self-contained temperature and humidity control module.
10 in stock
Description
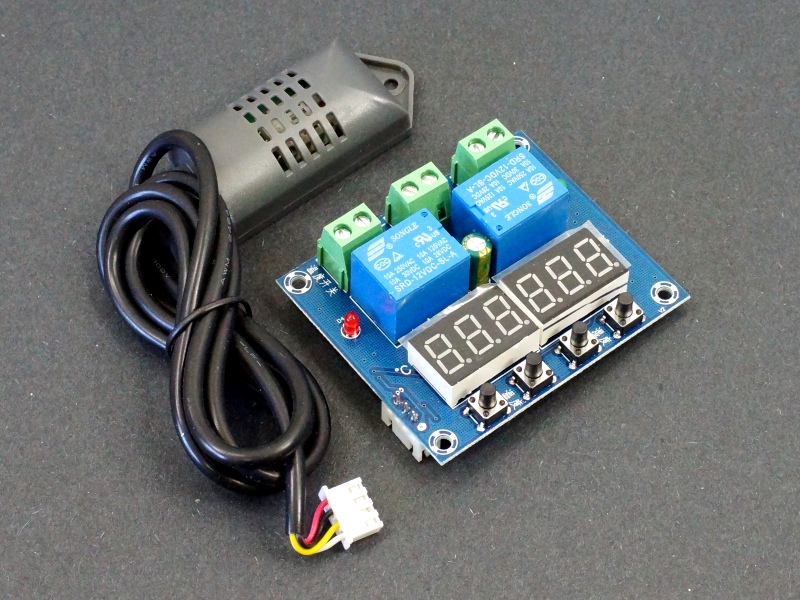
The XH-M452 Dual Temperature & Humidity Control Module is well suited for egg hatcheries, plant grow chambers and other enclosed spaces where you need to monitor and/or control both temperature and humidity of the air within the chamber.
PACKAGE INCLUDES:
- XH-M452 Dual Temperature & Humidity Control Module
- 1m (36″) long temperature humidity sensor probe
KEY FEATURES OF XH-M452 TEMPERATURE & HUMIDITY CONTROL MODULE:
- 3-digit displays of current temperature and humidity
- Operates in heating or cooling modes of operation
- Operates humidity and dehumidify modes of operation
- AM2120 temperature / humidity sensor w/ 36″ cable.
- Temperature range -40 to +60°C with ±0.5C accuracy
- Humidity range 0 – 99.9% RH with ±3% accuracy
- Relay switches up to 120VAC @ 10A or 15VDC @ 10A
- 12V module operation
The XH-M452 module provides two separate control circuits with one based on temperature and the other based on humidity. The relays associated with each circuit can be programmed to activate or deactivate based on user programmed settings.
The temperature circuit can be used to control an AC or DC based heating or cooling element like a heat lamp or fan. The humidity circuit can be used to control an AC or DC based humidifier, dehumidifier, fan, water pump or other humidity control element.
The relays are used to make / break the hot lead connection to the device(s) being controlled. In the case of 120VAC, the black LINE is run through the relay while the white NEUTRAL and any GROUND leads connect directly to the device. In the case of 12VDC for instance, it would be the 12V hot lead going through the relay while the GROUND is wired directly to the devices and do not pass through this controller.
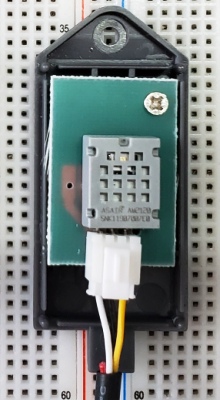
XH-M452 Dual Digital Temperature Humidity Controller – Sensor Opened
The AM2120 capacitive humidity/temperature sensor is on the end of a 1 meter / 3 foot cable. The cable is 4 wires, but only 3 are used. The sensor has a 3mm hole on the end for mounting. In most cases, mounting the sensor vertically such as on a wall gives the best reading. If heavy condensation is possible, it may be preferable to mount the sensor horizontally facing down to help keep water from collecting in the sensor and causing damage.
Air circulation within the enclosure is typically needed to ensure the sensor is reading the overall conditions within the enclosure.
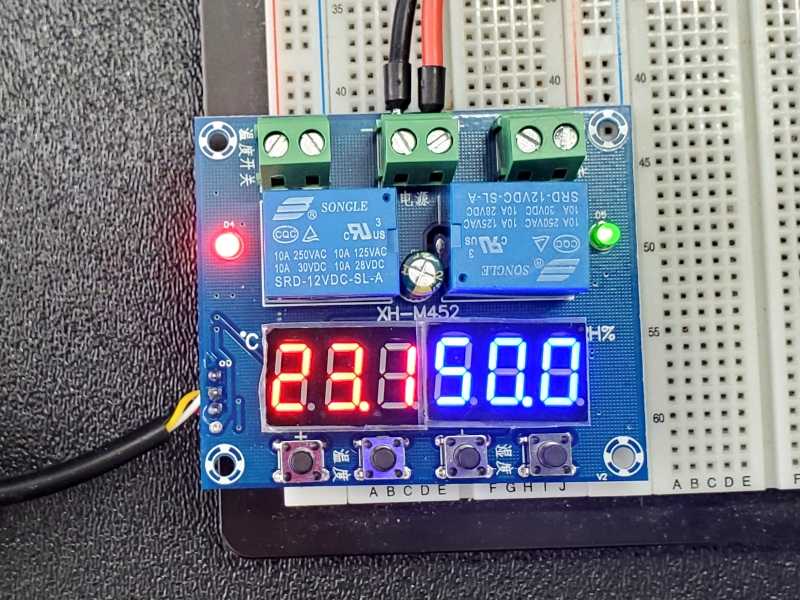
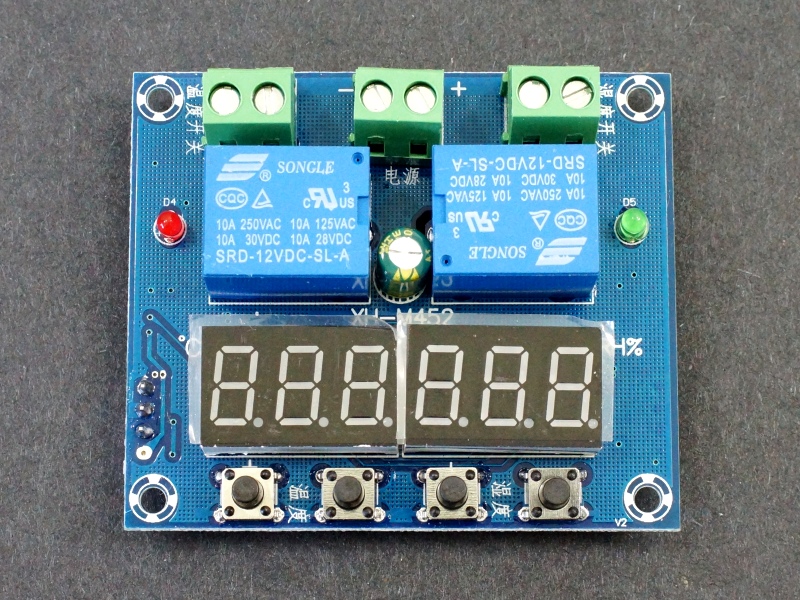
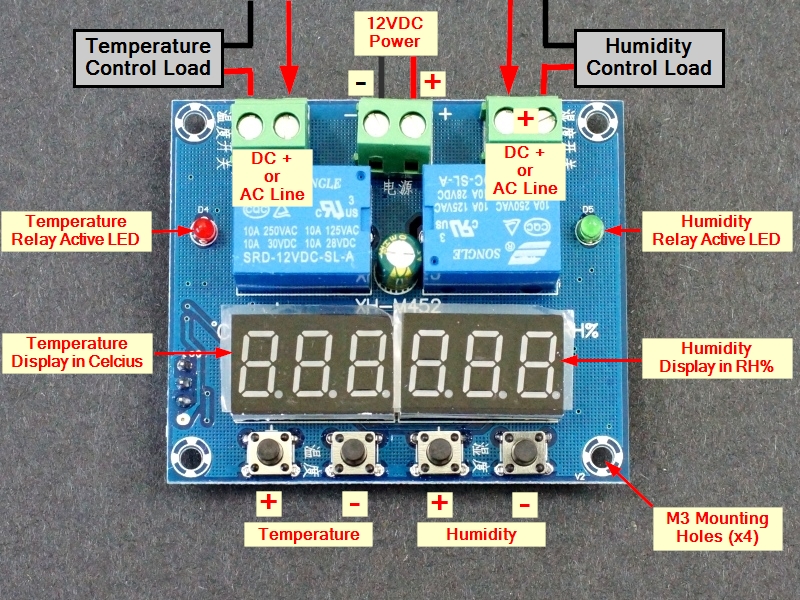
A red LED on the left side lights when the temperature relay is energized. A green LED on the right lights when the humidity relay is energized.
Module Power
The module itself is powered from 12VDC which is connected to the center screw terminal block. It draws approximately 100mA when both relays are energized. This power can come from an AC wall adapter or similar power source. If you are using 12VDC in your switching application, the module can be powered from the unswitched side of that power supply.
Display
The module has two 3-digit displays composed of 0.36″ high 7-segment displays.
The left red display normally shows current measured temperature in °C while the right blue display shows current measured humidity in % RH.
When programming settings, the display will flash and show the current setting. Once you stop pushing buttons, after about 2 seconds the display will default back to displaying the current measured temperature or humidity and the setting will be automatically saved.
If you apply power to the module without the sensor attached or the sensor is defective or has a broken wire, it will display ‘LLL‘.
A display of ‘HHH‘ indicates the reading has exceeded the displays capability.
Buttons
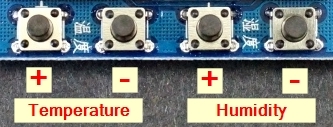
There are 4 buttons on the module that you can fiddle with. They are conveniently labeled in Chinese, so refer to the picture below for their functionality.
As might be expected, when changing settings the ‘+‘ increments the setting while the ‘-‘ decrements the setting for either temperature or humidity.
To restore to default factory settings, press both the two inside buttons (temperature – and Humidity +) for several seconds until the displays show ‘888 888’.
The default factory settings are to turn ON the temperature relay at 20°C (68°F) and turn it OFF at 30°C (86°F). The humidity relay is set to turn ON at 47% and turn OFF at 60%.
Button Operation
Temperature +
Short press to display current ON temperature
Long press (2 seconds) to set ON temperature.
- Display will flash.
- While display is flashing, the +/- buttons can be used to adjust the temperature relay ON setting up or down.
- After no button activity for a couple of seconds, the display will stop flashing and the setting will be automatically saved.
Temperature –
Short press to display current OFF temperature
Long press (2 seconds) to set OFF temperature.
- Display will flash.
- While display is flashing, the +/- buttons can be used to adjust the temperature relay OFF setting up or down.
- After no button activity for a couple of seconds, the display will stop flashing and the setting will be automatically saved.
Humidity +
Short press to display current ON humidity %
Long press (2 seconds) to set ON humidity %.
- Display will flash.
- While display is flashing, the +/- buttons can be used to adjust the humidity relay ON % setting up or down.
- After no button activity for a couple of seconds, the display will stop flashing and the setting will be automatically saved.
Humidity –
Short press to display current OFF humidity % temperature.
Long press (2 seconds) to set OFF humidity % temperature.
- Display will flash.
- While display is flashing, the +/- buttons can be used to adjust the humidity relay OFF % setting up or down.
- After no button activity for a couple of seconds, the display will stop flashing and the setting will be automatically saved.
Controlling Temperature
Heating mode:
The ON temperature is set lower than the OFF temperature and the relay is energized to turn ON a heating device of some type such as a heat lamp which goes back off once the OFF temperature is reached.
Cooling mode:
The ON temperature is set higher than the OFF temperature. The relay is energized to turn ON a cooling device of some type such as a fan. It turns back off once the OFF temperature is reached.
Controlling Humidity
Humidify Mode:
The ON humidity is set lower than the OFF humidity level. The relay is energized to turn on a humidity increasing device of some type such as a humidifier that is turned back off once the higher OFF humidity level is reached.
Dehumidify Mode:
The ON humidity is set higher than the OFF humidity level. The relay is energized to turn on a humidity lowering device such as a dehumidifier which is turned off once the lower OFF humidity level is reached
Module Connections
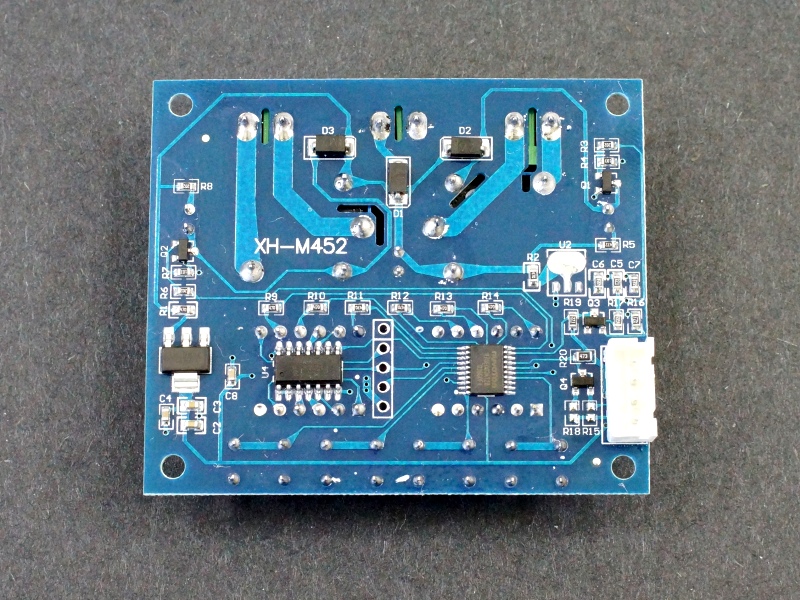
1×4 XH2.54 White Connector
The temperature sensor plugs into the white connector on the back of the module. It is keyed and will only go in one way. Though it is a 4-pin connector, only 3 pins are used.
Center 1 x 2 Screw Terminal Block (Module Power)
- – = Ground for the module. Connect to 12VDC supply ground
- + = Power for the module. Connect to +12VDC.
Left 1 x 2 Screw Terminal Block (Temperature Control Device)
- = Hot lead from temperature control device power source
- = Hot lead to temperature control device
Note that either lead can connect to either screw terminal as it is just acting as a switch.
Right 1 x 2 Screw Terminal Block (Humidity Control Device)
- = Hot lead from humidity control device power source
- = Hot lead to humidity control device
Note that either lead can connect to either screw terminal as it is just acting as a switch.
OUR EVALUATION RESULTS:
These modules work fairly well for their intended purpose and the fact that you can use it to either raise or lower temperature and/or humidity solves many use cases.
The main downside is that the programming can seem a little awkward at first until you play with it a bit. Also, the lack of clear markings on the buttons can be annoying but a Sharpie pen can fix that. Refer to our pictures until you find your Sharpie pen. It would also be nice if it could display in °F as well as °C, but conversion calculators can easily be found on the internet.
Also take note of a couple of recommended deratings when using this device:
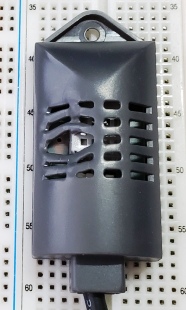
Melted Sensor
- The sensor is rated for up to 80°C, but that is also about the melting point of the sensor enclosure, so we recommend not using for applications over 60°C.
- The relays are rated for up to 30VDC, but we find these types of relays to become sticky when used with higher DC voltages so we recommend sticking with 15VDC or less.
In a more complex situation such as wanting to provide a range of acceptable temperature and humidity and then can either raise or lower those parameters as necessary to stay within that range would either require reprogramming of the device which may be acceptable if you are dealing with a seasonal type of change or in some cases it can be resolved by using two of these modules with one controlling devices to raise temperature or humidity and another to control the devices to lower temperature or humidity.
Obviously it is not necessary to use both sides of the controller if you need to just control either temperature or humidity. If you just need temperature control, I would recommend the W1209 as a cheaper and smaller alternative. The main value of this device is the humidity control or the flexibility to use either or if you plan to use it in a number of projects. In some cases, being able to monitor the humidity even if it is manually controlled, such as by putting water into a pan, can be handy.
Example Application
For our example application we are going to setup a fairly complex application where we want to keep both temperature and humidity within a certain range. In this case it is for a plant grow chamber, but with different settings could be used for a large egg incubator setup or perhaps an acrylic soaker for normalizing the temperature and moisture absorption of acrylic sheets before precision cutting.
Because we want to possibly raise and lower both temperature and humidity, the setup will require two of these modules with one taking care of raising parameters when needed and the other for lowering the parameters when required.
Since the sensors have some measurement error, both modules should be operated under the same conditions and the sensor measurements compared. It may be necessary to offset the settings of one module to better correlate to the other module. For instance, if one measures temperature 2°C higher, its settings should be set 2°C higher than the other module.
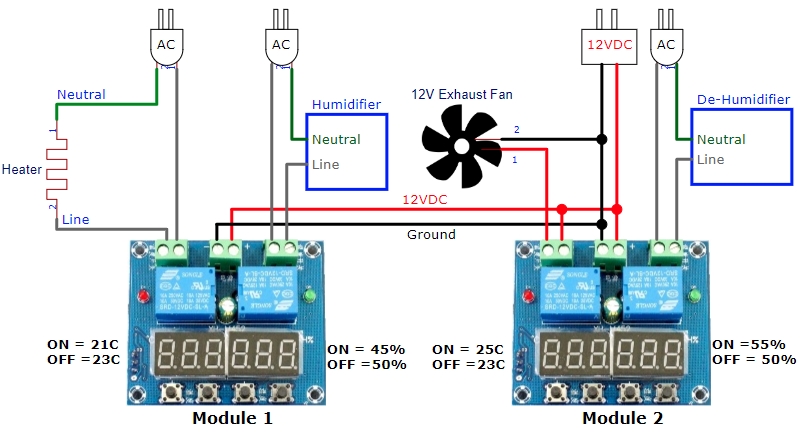
We are going to use a floor heater to increase temperature and an 12VDC exhaust fan to lower temperature. We are going to use a humidifier to increase humidity and a dehumidifier to lower humidity. The basic setup is shown below.
To prevent the devices being controlled from fighting each other i.e. trying to heat and cool at the same time, you would need to provide a guard-band / hysteresis in the settings. In other words don’t set one control to heat to 75°F and another one to start cooling at 75°F.
For our grow chamber the goal is to maintain a temperature range of 70-78°F (21.1°C – 25.6°C) and a humidity range of 45-55% RH.
Temperature Control
Module 1: If < 21°C, turn heater ON. If > 23°C turn heater OFF (heating mode)
Module 2: If > 25°C turn exhaust fan ON. If < 23°C turn exhaust fan OFF (cooling mode)
Humidity Control
Module 1: If < 45%, turn humidifier ON, if > 50% turn humidifier OFF (humidifier mode)
Module 2: If > 55%, turn dehumidifier ON, if < 50% turn dehumidifier OFF (dehumidifier mode)
BEFORE THEY ARE SHIPPED, THESE MODULES ARE:
- Inspected
- Basic temperature and humidity measurement and relay operation verified
- Packaged in a resealable high quality ESD bag for protection and easy storage.
Notes:
- No enclosure is available for this module
Technical Specifications
| Temperature Control | ||
| Temperature Range | -40 to +60°C | |
| Resolution | 0.1°C | |
| Accuracy | ±0.5°C | |
| Humidity Control | ||
| Humidity Range | 0 to 99.9% RH | |
| Resolution | 0.1% | |
| Accuracy | ±3% | |
| Sensor | AM2120 | |
| Relay Maximum Ratings | ||
| VAC | 120VAC/250VAC | 10A |
| VDC | 0-15VDC | 10A |
| Operating Ratings | ||
| DC Power Input | 12VDC | |
| Operating Current | Relays inactive | 40mA (typ) |
| Relays activated | 100mA (typ) | |
| Dimensions | L x W x H | 65 x 56 x 19mm (2.56 x 2.2 x 0.75″) |
| Temperature probe length | 90cm (36″) | |
| Country of Origin | China |
FURTHER READING

