


MicroSD Card Module
$0.79
Allows MicroSD cards to be written and read
55 in stock
Description
This MicroSD card module allows MicroSD cards to be written and read for applications that create or need access to large quantities of data.
PACKAGE INCLUDES:
- MicroSD Card Module (MicroSD Card not included)
KEY FEATURES OF MICROSD CARD MODULE:
- SPI Bus
- 3.3V operation
SD cards are commonly used for applications such as temperature logging where the time and temperature are recorded over long periods of time. It can also be used to serve large amounts of data such as graphic images.
This MicroSD card module should be thought of as a raw card slot and operates at 3.3V which is the voltage the MicroSD card operates at. The data lines must be at 3.3V logic levels to prevent damage to the MicroSD card and so this module is best used with 3.3V MCUs. If used with a 5V MCU, external logic level shifters are required for the SPI bus lines to avoid damage.
The data lines have 10K pull-up resistors to 3.3V on the module.
The 3.3V current draw will depend on the card being used with the module. When inactive the card may draw 500uA. When reading the card, 15-30mA is common. Write operations take more current and some cards are reported to require up to 100mA for write operations so this should be taken into consideration for selecting the power source. The Arduino 3.3V power which is typically good for about 30-50mA will typically work OK for reading the card, but may be insufficient for write operations. If you experience writing issues, this is the first thing to check.
Module Connections
The module has a male header installed. The module can be inserted directly into a breadboard which is handy since the pin labeling is visible or female Dupont style jumpers can be used to make connections to it.
1×6 Header
- 3V3 = 3.3V power.
- CS = SPI Chip Select
- MOSI = SPI MOSI, connects to MOSI on MCU
- CLK = SPI Clock
- MISO = SPI MISO, connects to MISO on MCU
- GND = Ground, must be common with the MCU
OUR EVALUATION RESULTS:
In the example we are using here, we are using the Mega 2560 Pro with level shifters.
Insert a MicroSD card into the module and wire up 3.3V and ground and the SPI pins as follows:
- CS – Uno pin 10, Mega 2560 pin 53
- MOSI – Uno pin 11, Mega 2560 pin 51
- CLK – Uno pin 13, Mega 2560 pin 52
- MISO – Uno pin 12, Mega 2560 pin 50
The IDE example program SD/CardInfo is a good way to test the basic setup and card. A slightly pruned down version is shown below.
You may need to change this line of code to match the SPI chip select pin for your MCU: const int chipSelect = 53;
An example output of the program is shown below.
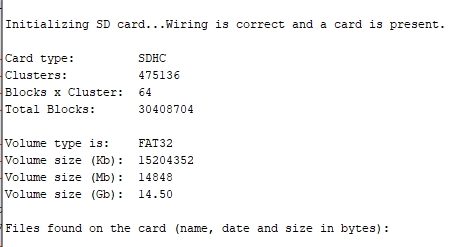
MicroSD Card Module Test Program
/*
  SD card test

  This example shows how use the utility libraries on which the'
  SD library is based in order to get info about your SD card.
  Very useful for testing a card when you're not sure whether its working or not.

 Connect 3.3V power and ground.
 Connect MOSI to MOSI - pin 11 on Uno, 51 on Mega 2560
 Connect MISO to MISO - pin 12 on Uno, 50 on Mega 2560
 Connect CLK to CLK - pin 13 on Uno, 52 on Mega 2560
 Connect CS to SPI Chip select - Pin 10 on Uno, 53 on Mega 2560
*/
// include the SD library:
#include <SPI.h>
#include <SD.h>

// set up variables using the SD utility library functions:
Sd2Card card;
SdVolume volume;
SdFile root;

// change this to match your SD shield or module;
const int chipSelect = 53;

void setup() {
  Serial.begin(9600);
  }

  Serial.print("\nInitializing SD card...");

  // we'll use the initialization code from the utility libraries
  // since we're just testing if the card is working!
  if (!card.init(SPI_HALF_SPEED, chipSelect)) {
    Serial.println("initialization failed. Things to check:");
    Serial.println("* is a card inserted?");
    Serial.println("* is your wiring correct?");
    Serial.println("* did you change the chipSelect pin to match your shield or module?");
    while (1);
  } else {
    Serial.println("Wiring is correct and a card is present.");
  }

  // print the type of card
  Serial.println();
  Serial.print("Card type:         ");
  switch (card.type()) {
    case SD_CARD_TYPE_SD1:
      Serial.println("SD1");
      break;
    case SD_CARD_TYPE_SD2:
      Serial.println("SD2");
      break;
    case SD_CARD_TYPE_SDHC:
      Serial.println("SDHC");
      break;
    default:
      Serial.println("Unknown");
  }

  // Now we will try to open the 'volume'/'partition' - it should be FAT16 or FAT32
  if (!volume.init(card)) {
    Serial.println("Could not find FAT16/FAT32 partition.\nMake sure you've formatted the card");
    while (1);
  }

  Serial.print("Clusters:          ");
  Serial.println(volume.clusterCount());
  Serial.print("Blocks x Cluster:  ");
  Serial.println(volume.blocksPerCluster());

  Serial.print("Total Blocks:      ");
  Serial.println(volume.blocksPerCluster() * volume.clusterCount());
  Serial.println();

  // print the type and size of the first FAT-type volume
  uint32_t volumesize;
  Serial.print("Volume type is:    FAT");
  Serial.println(volume.fatType(), DEC);

  volumesize = volume.blocksPerCluster();    // clusters are collections of blocks
  volumesize *= volume.clusterCount();       // we'll have a lot of clusters
  volumesize /= 2;                           // SD card blocks are always 512 bytes (2 blocks are 1KB)
  Serial.print("Volume size (Kb):  ");
  Serial.println(volumesize);
  Serial.print("Volume size (Mb):  ");
  volumesize /= 1024;
  Serial.println(volumesize);
  Serial.print("Volume size (Gb):  ");
  Serial.println((float)volumesize / 1024.0);

  Serial.println("\nFiles found on the card (name, date and size in bytes): ");
  root.openRoot(volume);

  // list any files in the card with date and size
  root.ls(LS_R | LS_DATE | LS_SIZE);
}

void loop(void) {
}
BEFORE THEY ARE SHIPPED, THESE MODULES ARE:
- Sample tested and inspected per incoming shipment
Notes:
- None
Technical Specifications
| Operating Ratings | ||
| Vcc | 3.3V | |
| Dimensions | ||
| PCB Board | L x W (PCB) | 20 x 18mm (0.8 x 0.7″) |
| With MicroSD card | 27 x 18mm (1.06 x 0.7″) | |
| Country of Origin | China |