L293D Dual H-Bridge Motor Driver
$1.95
General purpose driver handles 4.5 – 36V @ 600mA
89 in stock
Description
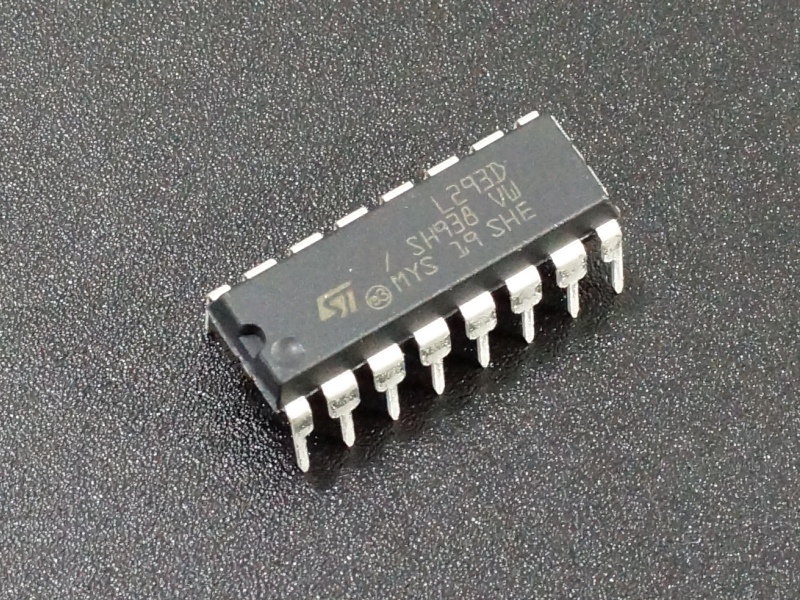
The L293D Dual H-Bridge Motor Driver is a general purpose high voltage / high current driver that can handle 4.5 – 36V @ 600mA continuous per channel
PACKAGE INCLUDES:
- L293D Dual H-Bridge Motor Driver
KEY FEATURES OF L293D DUAL H-BRIDGE MOTOR DRIVER:
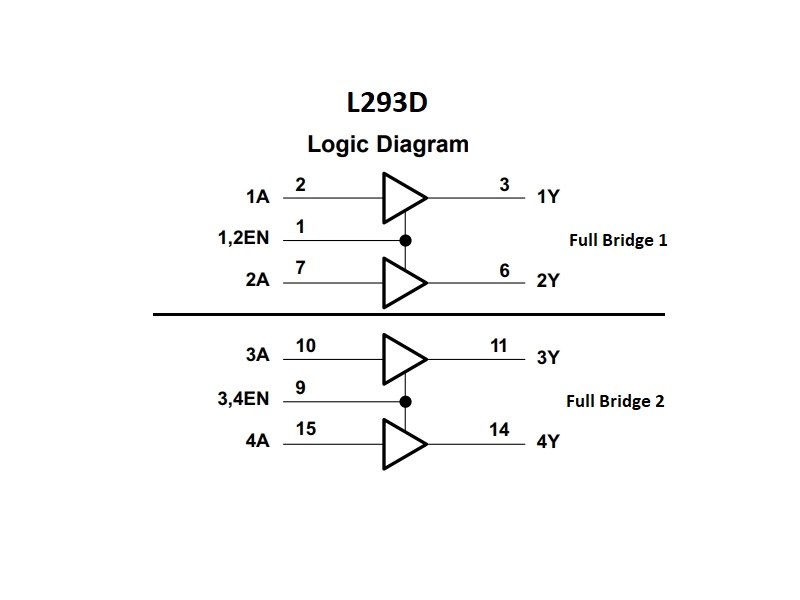
- Contains four half H-Bridges that can operate as two full H-Bridges
- Operate 2 motors with direction and speed control or 4 motors with speed control only
- Can supply 600mA current per channel continuous and 1.2A peak
- 4.5 to 36V motor voltage
- 5V compatible on logic pins
The L293D is a general purpose high voltage / high current driver that can handle up to 600mA per channel (1.2A peak non-repetitive) and can operate over the range of 4.5 – 36V. The chip includes built-in kick-back diodes to prevent damage when the motor is de-energized.
These devices are most often used to drive motors, but they can also be used to drive any inductive load such as relay solenoids or used to drive large switching power transistors.
Half-Bridge vs Full-Bridge
The chip contains four half H-Bridges that can be operated that way or can also be operated as two full H-Bridges. They are capable of driving up to 4 solenoids, 4 uni-directional DC motors, 2 bi-directional DC motors or 1 stepper motor.
A half H-Bridge configuration allows a motor to be operated in one direction. the Enable pins allow the motor to be turned ON/OFF or speed regulated by applying a PWM signal to these pins. The Enable pins are shared between channels 1&2 and 3&4 which limits the usefulness of this mode.
A full H-Bridge configuration allows a DC motor to be run in both directions by reversing the current flow through the motor. The Enable pins allow the motors to be turned ON/OFF or speed regulated by applying a PWM signal to these pins. This is the most common mode of operation.
If higher output current is required, the outputs can be run in parallel to get drive currents of up to 1.2A. When paralleling outputs, channel 1 & 4 should be paralleled and channel 2 & 3 should be paralleled. It is also possible to piggy-back a second chip on top of the first and solder the pins together to maintain full two H-Bridge functionality while also doubling the current handling to 1.2A.
Unidirectional DC Motor Control (using half H-Bridge)
This table covers 1 of the 4 half H-Bridges in the device. 1A channel is shown but all 4 channels (1A/2A/3A/4A) behave the same. Note that the EN pins are shared between Channels 1&2 and 3&4.
Also, note that is in this half bridge configuration, one side of the motor will be connected directly to power or ground, so the direction control pins (1A in this case) will have the opposite effect depending on how the motor is wired.
| EN | 1A | Function (Motor connected to VCC2) | Function (Motor connected to Ground) |
| H | L | Motor Run | Fast Motor Stop |
| H | H | Fast Motor Stop | Motor Run |
| L | X | Free-running Motor Stop | Free-running Motor Stop |
Bidirectional DC Motor Control (using full H-Bridge)
This truth table covers the left half of the chip which forms one full H-Bridge. The right side is a duplicate with 1A and 2A replaced with 3A and 4A.
| EN | 1A | 2A | Function |
| H | L | H | Motor Turn Right |
| H | H | L | Motor Turn Left |
| H | L | L | Fast Motor Stop |
| H | H | H | Fast Motor Stop |
| L | X | X | Free-Running Motor Stop |
Connecting Power
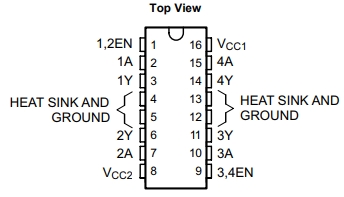
Take note that there are two power pins which are marked various ways depending on what datasheet you are looking at. The important thing to remember is that pin 16 is the logic power and needs to be connected to 5V which can come from the uC or separate power supply. Pin 8 is the motor power and can vary between 4.5 and 36V.
The IC package has 4 ground pins. These are all connected internally and are used to help heat sink the chip when soldered to a PCB ground plane and handle the current under high load conditions. For experimenting under light loads, only one needs to be connected.
OUR EVALUATION RESULTS:
These are old school devices, but they are easy to use, inexpensive, robust and get the job done when working with motors that don’t require a lot of current.
Quick Breadboard Control Example
To get a feel for how the IC works in the full H-Bridge arrangement that allows for DC motor operation in both directions, do the following exercise:
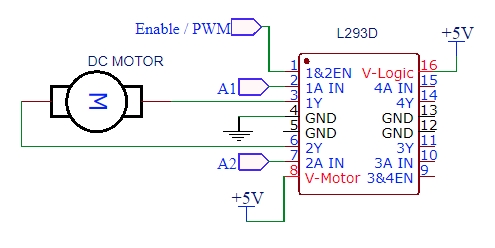
- Connect 5V to both pins 8 and 16. These are the motor and digital power pins respectively.
- Connect one of the ground pins (like pin 4) to ground. There are 4 pins, but only one needs to be connected for this exercise.
- Connect a smaller DC motor that draws less than 600mA to pins 3 and 6 (1Y/2Y). These are the two motor driver outputs for one of the channels.
- Apply 5V power and nothing will happen because we haven’t told the motor which direction to turn yet.
- Connect jumper wires to pins 2 & 7 which are the 1A/2A control pins for this full-bridge.
- Connect the other end of one of the wires to ground and the other wire to 5V. The motor should start turning.
- Now swap the power and ground connections to these 2 wires and the motor should start turning in the opposite direction,
- From this we learn that we can control the motor direction using logic levels on these two pins as per the logic truth table above.
- Now connect a jumper wire to pin 1 (1&2 EN). This pin is active HIGH. If this jumper is connected to ground, the motor should stop. If it is connected to 5V or simply left floating, the motor should run. If you were quick enough you could plug this jumper in and out of the ground connection really fast and control the speed of the motor by momentarily enabling/disabling the drive to it. Using a PWM pin on a uC automates this process and allows us to control the speed of the motor under program control which we’ll do below.
Hooking the L293D up to a uC
To take our simple setup to the next level, the program below automates the control of the basic setup above using an Arduino or similar uC and gives you control of the motor through the Arduino IDE Serial Monitor window by entering commands. Your just need to connect the 1A/2A and EN control pins on the IC to pins 9, 8 and 10 on an uC. You can use other digital pins, just make sure that you redefine them in the program. The EN pin does need to be connected to a PWM capable pin.
The valid commands to type into the Serial Monitor Window include:
F = Motor FORWARD
R = Motor REVERSE
S = Motor STOP
P = Short for PWM, it sets or gets the motor speed. P by itself does nothing.
P? = Get the current speed setting from the uC
P1 –P255 = Sets the PWM value which controls the speed of the motor. This needs to all be typed on the same line before hitting ‘Send’ or the RETURN key to transmit the command to the uC.
Note that at low value speed settings like P5, the motor will not turn because it is not getting enough power, but you may hear it whining a bit. This varies by motor and the voltage that your are driving it at. If 5V is too low for your motor, you can change the voltage on pin 8 to a higher value or just stick with higher PWM values. You may have to use values in the range of P25-50 to get things moving.
The directions of ‘F‘orward and ‘R‘everse are relative to how the motor is wired to the L293D. The wires to the motor can be swapped if it is desired to reverse the direction relative to the commands being given.
The program is somewhat simplistic to keep it reasonably short. If the PWM value is zero, it assumes this is because the number given could not be converted to an integer and ignores it. This means you can’t send the command ‘P0‘ to stop the motor because it will be ignored. Use the ‘S‘ command instead.
Using The Serial Monitor Window To Send Commands
Usually the Serial Monitor window is used only for displaying returned characters from the Arduino. Since we are using it also for input, it is worth noting a few things.
When using the Serial Monitor window for input, the commands need to be typed into the small top window, not the main window. A carriage return or hitting the ‘Send‘ button sends the command typed into this window to the Arduino.
The program echos the command (like ‘R‘) back to the main window. This is confirmation that the command was received by the Arduino. It then sends a string of what it is doing with that command (like ‘Motor Reverse‘) as confirmation that it not only received the command but also understood and executed the command.
Make sure the baud rate is set to the rate you have set in the program. Program sets it to a default of 9600.
On my setup I find that if the default ‘Both NL & CR‘ setting is used at the bottom of the Serial Monitor window, the window tends to hang intermittently. Commands are still be sent and acted on by the Arduino, but the output from the Arduino stops being shown. Closing and reopening the windows temporarily clears the problem. Using ‘Carriage return‘ seems to work fine. I am not sure why that is.
L293D Dual H-Bridge Motor Driver Example Program
/*
Exercise L293 Motor Driver IC
Uses Serial Monitor window to issue commands for controlling a DC motor
connected to channels 1 & 2 on an L293D chip.
*/
const int EN_PIN = 10;  // Must be PWM pin.  Connect to Pin 1 on L293
const int A1_PIN = 9;    // Can by any digital pin.  Connect to pin 2 on L293
const int A2_PIN = 8;    // Can by any digital pin.  Connect to pin 7 on L293

char readString[4];  // String array to hold PWM value typed in on keyboard
int PWM_Value = 0;   // Our current PWM motor speed value
//===============================================================================
//  Initialization
//===============================================================================
void setup() {
  pinMode(EN_PIN, OUTPUT);  // Initialize output pins
  pinMode(A1_PIN, OUTPUT);
  pinMode(A2_PIN, OUTPUT);
  Serial.begin(9600);       // Initialize serial monitor
}
//===============================================================================
//  Main
//===============================================================================
void loop() {
// Basically just loop while monitoring the serial port and then jump to DoSerial to
// handle incoming characters and act on them
if (Serial.available()) DoSerial();
}
//===============================================================================
//  Subroutine to handle characters typed via Serial Monitor Window
//===============================================================================
void DoSerial()
{
  int index = 0;
  int PWM_Test_Value = 0;
  char ch = Serial.read();  // Read the character we know we have
  Serial.println(ch);       // Echo character typed to show we got it

  // Use Switch/Case statement to handle the different commands
  switch (ch) {
  case 'f':   // Motor FORWARD command
  case 'F':   // This fall-through case statement accepts upper and lower case
    digitalWrite (A1_PIN, LOW);
    digitalWrite (A2_PIN, HIGH);
    Serial.println("Motor Forward");
    break;

  case 'r':   // Motor REVERSE command
  case 'R':
    digitalWrite (A1_PIN, HIGH);
    digitalWrite (A2_PIN, LOW);
    Serial.println("Motor Reverse");
    break;

   case 's':   // Motor STOP command
   case 'S':
    //digitalWrite(EN_PIN, LOW);
    digitalWrite (A1_PIN, LOW);
    digitalWrite (A2_PIN, LOW);
    Serial.println("Motor Stop");
    break;

  case 'p':  // Motor SPEED command
  case 'P':
    // This command is a little trickier.  We are looking for a number from 0-255
    // to follow this command so we can set the PWM speed.  If we see a '?'
    // we will report our current speed setting, otherwise we start collecting chars
    // into the readString array.
    delay(2);  // Give time for more characters to arrive.
    for (int i; i<4; i++) readString[i] = ' ';  // Clear buffer
    while (Serial.available())  // Read what we get and put into the string array
    {
      char c = Serial.read();
      readString[index] = c;
      index++;
      delay(2);
    }
    readString[3] = ''; // Append null to end of string array to make it a valid string
    index = 0;            // Reset our index back to the start of the string
    if (readString[index] == '?')   // ? means report our current speed setting and exit.
    {
      Serial.print("Current PWM Setting: ");
      Serial.println(PWM_Value);
      break;
    }
    PWM_Test_Value = atoi(readString);  // Try to convert string into integer
    // We assume a 0 value is because of a non-valid input and ignore the command
    if(PWM_Test_Value!=0) {
      if (PWM_Test_Value > 255) PWM_Value = 255;     // Cap WPM setting at 255
      else PWM_Value = PWM_Test_Value;
      Serial.println(PWM_Value);        // Echo what we end up with to confirm we got it
      analogWrite(EN_PIN, PWM_Value);   // Set new speed on PWM pin.
    }
    break;

  default:
    break;
  }
  delay(10);
}
Notes:
- None
Technical Specifications
| Operational Ratings | Vcc2 (Motor) | 4.5-36V |
| Vcc1 (Internal Logic) | 5V | |
| Max Current | 600mA (per channel) | |
| Max Current (non-repetitive) | 1.2A (per Channel) | |
| Vcc1 Max Current | 60mA | |
| Package | DIP-16 | |
| Package Type | Plastic, thru-hole | |
| Mfr | TI / ST | |
| Datasheet | L293D |


