HC-05 (ZS-040) Bluetooth Module
$10.95
Master/Slave serial data to Bluetooth bridge module
9 in stock
Description
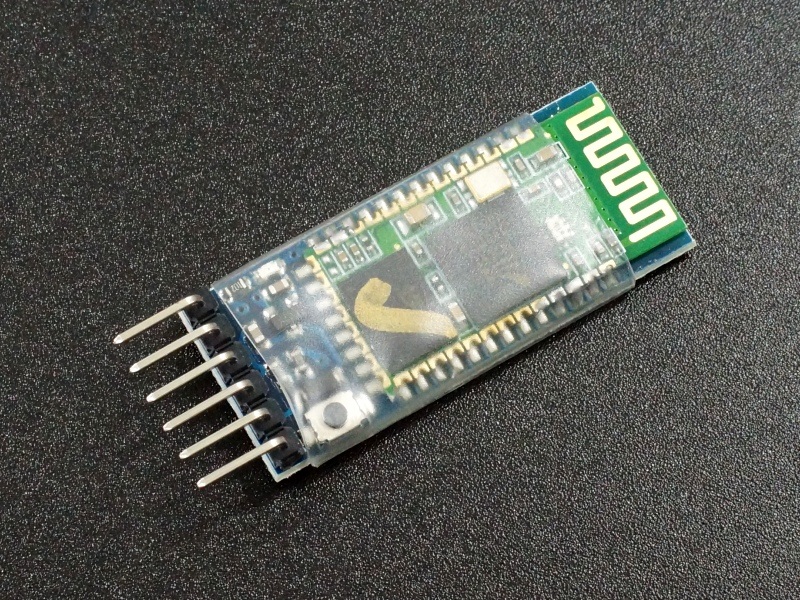
The HC-05 (ZS-040) is a serial to Bluetooth bridge module that allows for wireless communications between two microcontrollers or between a microcontroller and an Android phone, laptop or desktop PC with Bluetooth capability. The HC-05 (ZS-040) can act as both a slave and master device.
PACKAGE INCLUDES:
- HC-05 Bluetooth Module with ZS-040 baseboard
KEY FEATURES OF HC-05 BLUETOOTH WITH ZS-040 BASEBOARD MODULE:
- Bluetooth V2.0 Operation
- ZS-040 Baseboard
- Operates in Master or Slave mode
- 3.6-6V Power
If you are familiar with serial communications with the Arduino or other MCU, using Bluetooth to establish a wireless link is very similar. Bluetooth is designed for short range wireless point-to-point communications. The maximum range is typically around 30 feet and may be less depending on obstructions.
Power
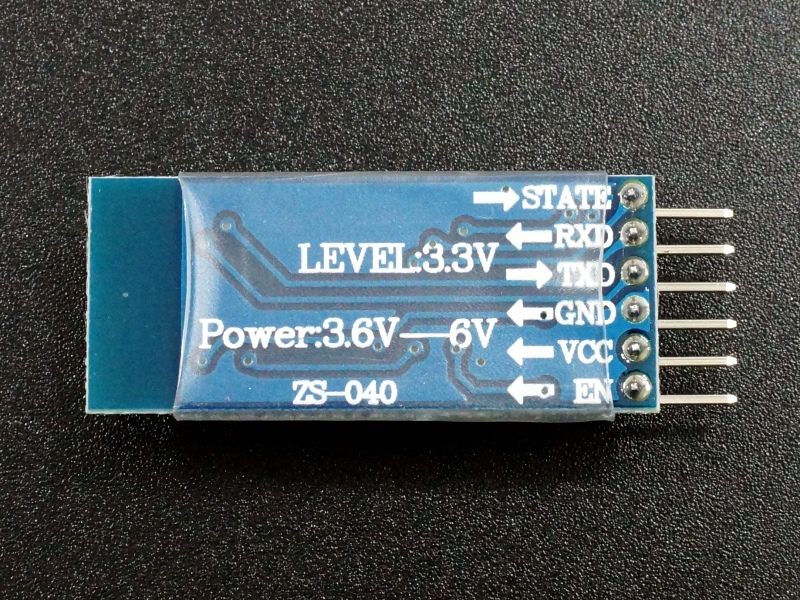
The module operates at 3.3V internally, but the module contains a 3.3V regulator, so the module must be fed with 3.6 – 6V on its Vcc pin. Because the module is 3.3V, the TX line of the uC that goes to the RX pin on the module should have a level shifter installed to drop the logic level down to 3.3V levels as demonstrated in our example below.
Communication Mode
The module defaults to communication mode where it is ready to pair with another Bluetooth device and later when it has been paired. The serial communications in this mode defaults to 9600 baud, but can be changed if desired.
AT Mode
The module can also be put into AT mode of operation where it responds to low level commands.
To enter AT mode, press the button on the module while it is being powered up and then release the button. The LED will flash slowly to indicate it is in AT mode. AT mode allows you to send low level AT commands to the device. Note that the module is in a limited AT mode and some AT commands will not work unless the button is depressed while the command is given.
If the AT mode of operation will be how the module will always be used, the module can be placed into full AT mode by connecting the EN pin to 3.3V. This is the same thing as constantly pressing the button.
When in AT mode, the serial communications default to 38400 baud rate but it can be changed if desired.
LED Indicator
There is an LED on the module that is quite useful to understanding what the module is up to.
When the module is first powered up, it comes up in Bluetooth pairing mode. The LED on the board flashes rapidly at about 2Hz to indicate it is in pairing mode. If the module is paired with a device, the LED flash changes to 2 quick flashes followed by a pause and then repeats.
If the module is instead put into AT mode, the LED will blink at a slow steady rate.
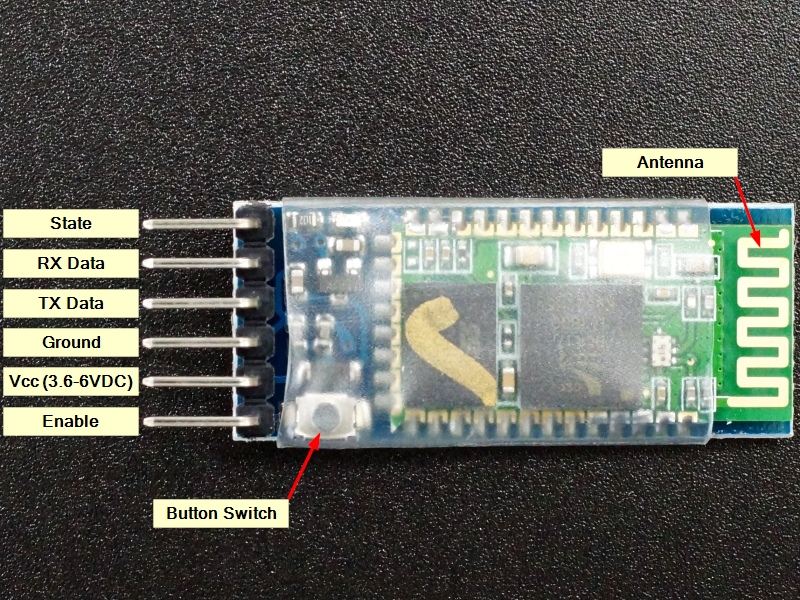
Board Connections:
1 x 6 Header
- STATE – The State pin is LOW when unpaired and HIGH when it is paired.
- RXD – Receive Data connects to TX on MCU. Use a level shifter if using a 5V MCU
- TXD – Transmit Data connects to RX on MCU
- GND – Ground
- VCC – Power in. Must be between 3.6-6V
- EN – Enable AT mode. This pin can be tied to 3.3V if the module will always be used in AT mode
Our Evaluation Results:

Level Shifter
For a quick basic check, you can apply 5V and ground to the HC-05 module. The LED should flash at a fast rate. Open the Bluetooth menu on a cell phone and scan for devices. It should find the HC-05. Enter the password “1234” and it should pair with the device. The HC-5 LED will start blinking at a slower rate to show that it has successfully paired.
In the example below, we show you how to pair an Arduino to a Windows 10 PC and communicate between the two using Bluetooth. Using an Android phone works essentially the same.
It uses Softserial to allow the Arduino to communicate to the Serial Monitor window via USB while also communicating to the HC-05 Bluetooth module using the soft serial port. If you are using a Mega or other MCU with more than one hardware serial port, you can use a 2nd hardware serial port instead of using Softserial.
If using a 5V MCU, use a logic level converter or a simple resistor divider network as shown here to shift the logic level of the RX pin on the HC-05 for compatibility with the 3.3V HC-05.
You will need a terminal program on the PC or phone that can communicate over Bluetooth. I use Bluetooth Serial Terminal on the PC and Blueterm on the Android phone, but there are many free ones to chose from.
Connect the HC-05 to the MCU. The STATE and EN pins can be left disconnected.
| MCU | HC-05 Module |
| 5V | Vcc |
| GND | GND |
| D10 | TX |
| D11 | RX – Use level shifter if using 5V MCU |
Load the following software into the Arduino. Note that the D10 & D11 pins can be reassigned to any other two digital pins if desired by changing the SoftSerial(10,11); command to reflect the different pins being used. The RX pin used does need to support interrupts to be compatible with the SoftSerial library.
HC-05 Bluetooth Module Test Program
/*  Simple program to exercise the HC-05 zs-40 Bluetooth module by pairing with a PC

Uses hardware serial to talk to the host computer and software serial for
communication with the Bluetooth module

Connections
  Arduino 5V to module VCC
  Arduino GND to module GND
  Arduino D9 to module RX using a voltage divider
  Arduino D8 to module TX

  When a command is entered in the serial monitor on the computer
  the Arduino will relay it to the bluetooth module and display the result in
  the Bluetooth terminal window and vice versa.

  Uses Softserial.h library
*/
#include <SoftwareSerial.h>
SoftwareSerial SoftSerial(10, 11); // RX | TX pins.  Can be reassigned to other pins if needed

const long BAUDRATE = 9600;    // This is the default communication baud rate of the HC-05 module
char c = ' ';                  // Character being transmitted
boolean NL = true;             // Newline.  True indicates we should show a '>'
//===============================================================================
//  Initialization
//===============================================================================
void setup()
{
    SoftSerial.begin(BAUDRATE);  // Init soft serial object
    Serial.begin(9600);          // Init hardware serial
    Serial.println("Test started - Enter something to send to computer or Android phone");
    SoftSerial.println("Test started - Enter something to send to Serial Monitor Window");
}
//===============================================================================
//  Main
//===============================================================================
void loop()
{
     // Read from the Bluetooth module and send to the Arduino Serial Monitor
    if (SoftSerial.available())
    {
        c = SoftSerial.read();
        Serial.write(c);
    }
     // Read from the Serial Monitor and send to the Bluetooth module
    if (Serial.available())
    {
        c = Serial.read();
        SoftSerial.write(c);

        // Echo the user input to the main window. The ">" character indicates the user entered text.
        if (NL) { Serial.print(">");  NL = false; }
        Serial.write(c);
        if (c==10) NL = true;    // char '10' is the newline character
    }

}
The HC-05 LED should be in fast flash mode which indicates it is waiting to be paired.
Pair the HC-05 with the device you are communicating with. The module will show up on the Bluetooth list as ‘HC-05’. The PIN/password to connect is ‘1234’.
To pair the device on Windows 10, perform the following steps:
- Open the Settings / Devices / Bluetooth & other devices window.
- Click on the ‘+ Add Bluetooth or other device’ at the top of the window
- This opens ‘Add a device’ window. Select ‘Bluetooth’.
- The PC will search for Bluetooth devices to add. If it doesn’t see the HC-05, disconnect and reconnect 5V power to the HC-05 module to ensure it is in pairing mode and it should show up in the list.
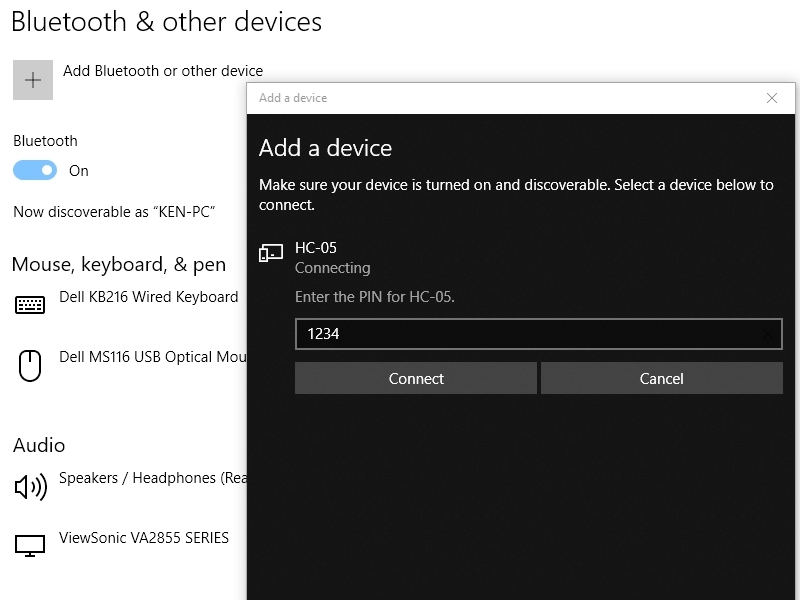
- Select the HC-05 and it will open a window to enter a PIN for the HC-05. Enter ‘1234’ and select Connect.
- After a couple of moments, the window should show ‘Paired’ and you are ready to go. Once successfully paired, the LED on the HC-05 changes to a double-flash / pause mode.
The pairing window on a Windows 10 PC looks like this.
On the Bluetooth Serial Terminal or whichever program you are using on the PC or Android phone, ensure that you select ‘Carriage Return and Line Feed’ for line termination.
If the HC-05 does not show up in the list of available devices, select ‘Refresh List’. Select the HC-05 and select ‘Connect’.
If you have difficulty connecting to the HC-05 using a Windows 10 PC, you may find this link to be helpful.
On the Arduino, open the Serial Monitor Window. Ensure that it also has both NL & CR selected and that the baud rate is set for 9600.
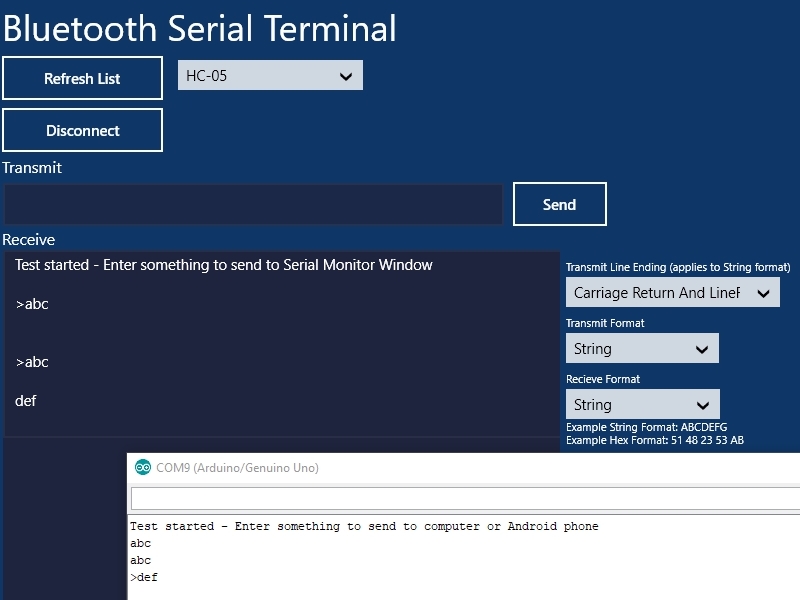
You can now type commands into the Bluetooth Serial Terminal and they will show up in the Arduino Serial Monitor Window or vice versa. Make sure that you type the commands in the upper windows. Commands that are sent are echo’d with a ‘>’ in front of it. Received commands are printed without the ‘>’ so that you can easily differentiate between them.
The picture below shows both the Bluetooth Serial Terminal and Arduino Serial Monitor Window where ‘abc‘ has been typed in the Bluetooth Serial Terminal window and ‘def‘ has been typed in the Serial Monitor window. If you get this far, you have successfully communicated between an Arduino and a computer or phone using Bluetooth.
Before they are shipped, these modules are:
- Sample inspected and tested per incoming shipment.
Notes:
- None
Technical Specifications
| Operating Ratings | ||
| Baud Rate | Normal Communications Mode | 9600 (default) |
| AT Mode | 38400 (default) | |
| Vcc | 3.6 – 6V | |
| Ityp | Pairing | 45mA |
| Ityp | Paired, idle | < 8mA |
| Dimensions | L x W (PCB) | 37mm x 16mm (1.46 x 0.63″) |
| Country of Origin | China | |
| Datasheets | CSR BC417 Bluetooth Chip |
Further Reading
Martyn Currey has an excellent series of articles related to using wireless communications, especially with Arduino. This is a link to his articles related to the HC-05

