Working With Ethernet
Ethernet Quick Overview
Ethernet allows a number of computers to form a LAN (Local Area Network) with specific protocols to control the passing of information over network cables. The network connections can also be wireless in which case it is called WLAN (Wireless LAN) or Wi-Fi.
The Ethernet hardware is referred to as the physical layer and is composed of the ICs and other components that electrically manipulate and transmit/receive the data. The physical layer determines the maximum speed of the Ethernet which can be anywhere from 10 Mbps up to 1000 Gbps.
The 10 Mbps standard is a relatively old standard and little used anymore. 100 Mbps is the most common standard and serves most basic needs. The newer Gbps standards are especially useful for larger network backbones that need to carry a lot of traffic in businesses or for carrying video or other high bandwidth traffic.
A MAC address (Media Access Control address) is a 12-digit hexadecimal number that is a permanent part of the physical layer that uniquely identifies a specific network device from any other device in the world. The MAC address is burned into the IC that implements the network functionality. The MAC address is kind of like the physical street address for getting your mail and will never change unless you change the hardware (house).
IP (Internet Protocol) is the first layer of software that runs on top of the underlying physical layer that takes care of the basic formatting of data sent over the network. It basically takes care of getting the bits from point A to point B.
An IP address is the logical address of a particular computer on the network. The IP address can be assigned automatically using DHCP (Dynamic Host Configuration Protocol) or a specific fixed static IP can be assigned if you care what the IP address is. The IP address may change over time unlike the MAC address and it is kind of like having a temporary PO Box for getting your mail.
There are other software layers that run on top of the IP layer with names like UDP (User Datagram Protocol) or TCP (Transmission Control Protocol) that add various levels of functionality to improve reliability and robustness of the underlying networks. These upper layers of software are chosen based on the application requirements and the technical capabilities of the physical layer.
Teeny 4.1 Ethernet Physical Implementation
The Teensy 4.1 has the Ethernet physical layer built into the NXP 1.MX RT1062 microcontroller. This includes a unique MAC address that is burned into every Teensy 4.1. A separate DP83825I Ethernet PHY transceiver chip on the Teensy 4.1 provides the electrical interface between the microcontroller and the physical RJ45 Ethernet connector.
Note: The Teensy 4.1NE (No Ethernet) does not have this PHY chip and therefore does not support Ethernet connections.
The RJ45 Ethernet connectors used with Teensy 4.1 are called MagJacks because they include magnetics (transformers) as well as capacitors and resistors within the connector that are needed to couple the high-speed Ethernet data to and from the CAT network cable while also providing electrical isolation.
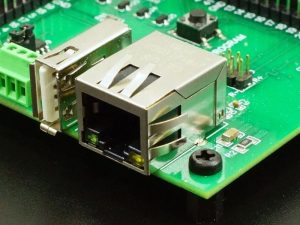
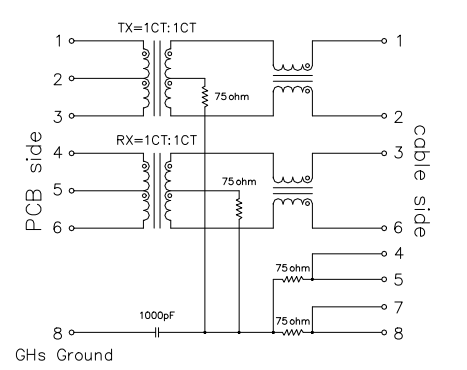
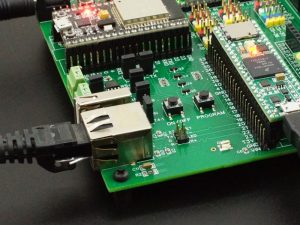
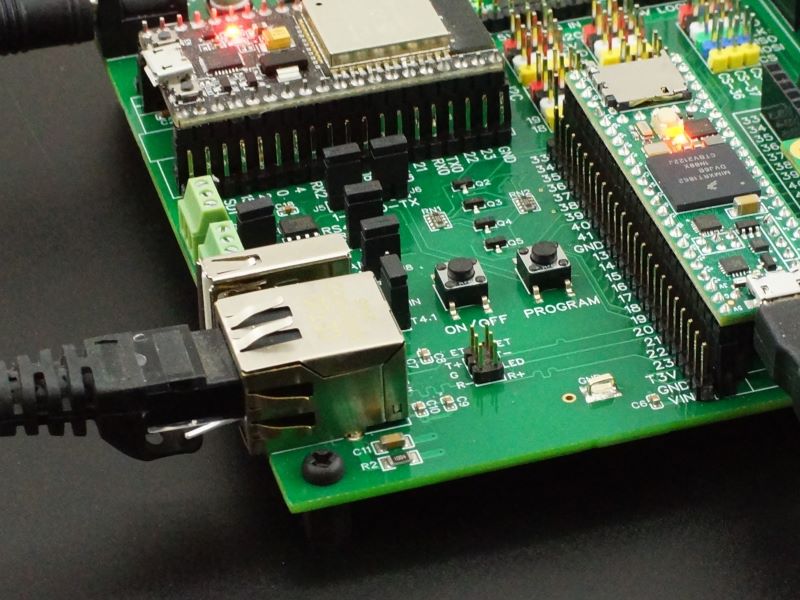
The Prototyping System for Teensy 4.1 has a built-in MagJack that connects to the Ethernet header on the Teensy 4.1 (technically it is connecting to the PHY chip). It makes the connection via a 6-pin extended reach male header that mates with a female header on the bottom of the Teensy 4.1.
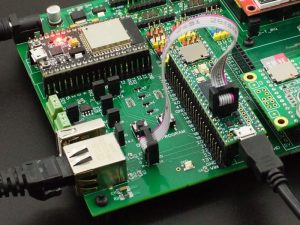
Alternatively, if using a Teensy 4.1 with a standard male header mounted on top, an IDC ribbon cable can be used to connect to the MagJack by plugging it into the male header on the baseboard next to the MagJack. Note the orientation of the red strip where it plugs in on both ends of the cable.
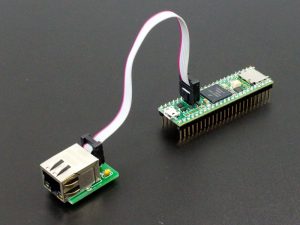
The examples shown here can of course also be run using a standard Teensy 4.1 with the optional Ethernet adapter plugged into it if you aren’t working with the Prototyping System for Teensy 4.1 baseboard.
Teensy 4.1 Ethernet Library Support
Ethernet is inherently complicated and requires software libraries to do the heavy lifting for us.
The original Arduino Ethernet library has been around for a long time and most beginner examples are based on it and it can be used with Teensy 4.1 with some adaptations.
There is also a library called NativeEthernet which is specifically written for the Teensy 4.1 and has fairly wide usage. It is not currently well supported.
There is now a newer Ethernet library that is not only designed specifically for Teensy 4.1, but is also very actively supported. That library is called QNEthernet by Shawn Silverman and is what we are using in our examples here.
Documentation can be found on GitHub at: https://github.com/ssilverman/QNEthernet
The QNEthernet library can be installed from the Arduino IDE Library Manager. With the library installed, a number of example programs are included, but these unfortunately start out at a pretty advanced level.
To help fill in a bit with the learning curve, we have updated a couple of the ubiquitous getting started examples called LinkStatus and WebServer to work with this library. These are usually the first couple of example programs everyone tries to run when starting to work with Ethernet.
LinkStatus / LinkState Example
The LinkStatus program is the ‘Hello World’ equivalent when working with Ethernet. It simply checks to see if an active network cable is connected and so is a good place to get our toe wet. The QNEthernet library calls it LinkState, so that is what we are calling it here.
A couple of quick notes about using Ethernet with the Teensy 4.1 compared to standard Arduino Ethernet setups that use a separate adapter or shield.
- You don’t need to define a CS (Chip Select) pin as the Ethernet functionality is built into the Teensy microcontroller and PHY chips that use dedicated pins and signals that the user does not have direct access to. The Teensy 4.1 already knows which pins to wiggle.
- The Teensy 4.1 has an built-in MAC address which the library automatically uses, so it is not necessary to create or specify a dummy address as with other libraries.
To use this example program, copy and paste it into the IDE, download it to the Teensy 4.1 and open the Serial Monitor window.
Connecting an active network cable should show ON when the cable is connected and the green LED on the MagJack will be on and should occasionally blink. It will show OFF when the cable is disconnected and the LED on the MagJack will be off.
/*
  Teensy 4.1 Link State
  This sketch prints the Ethernet link state. When the
  Ethernet cable is connected the link status should go to "ON"
  otherwise it is set to "OFF"

  This example uses the QNEthernet.h library
*/
#include <QNEthernet.h>

using namespace qindesign::network;
//===============================================================================
//  Initialization
//===============================================================================
void setup() {
  Ethernet.begin();
  Serial.begin(115200);
}
//===============================================================================
//  Main
//===============================================================================
void loop() {
  bool link = Ethernet.linkState();
  Serial.print("Link State: ");
  if (link==true){
    Serial.println("ON");
  }else {
    Serial.println("OFF");
}
  delay(1000);
}
These 3 statements are included in any program using this library.
#include <QNEthernet.h>

using namespace qindesign::network;

void setup() {
  Ethernet.begin();
The first #include <QNEthernet.h> includes the library itself.
The using namespace qindesign::network; statement allows the names from the library to be used without requiring an explicit qualifier which simplifies writing and understanding the software. Most of the library commands start with Ethernet.
The Ethernet.begin(); statement in setup() initializes the library using the Teensy 4.1’s internal MAC address and starts the DHCP client which automatically provides an IP address so we can access the network.
Finally, the Ethernet.linkState(); simply returns a boolean value of whether the cable is connected or not.
WebServer Example Program
To step up our Ethernet game a notch, we’ll take a look at the WebServer example that is often the next program that people try to run as it starts to put a couple of the different pieces together to create a complete application albeit a fairly simple one.
A web server as the name implies serves up content for the web. In this case, the Teensy 4.1 will act as a web server to serve up the data it is reading from 6 analog inputs so that the data can be displayed in a web browser.
First copy and paste the following program into the IDE and then make the couple of edits that are outlined below before downloading to the Teensy 4.1.
Teensy 4.1 WebServer Example Program
/*
  Teensy 4.1 WebServer Example

  This program reads 6 analog inputs on the Teensy 4.1 and sends the results to
  a webpage in a web browser

  Modify the IPAddress ip, sn and gw to match your own local network
  before downloading the program.

  Based on the WebServer example program
  This example uses the QNEthernet.h library
*/

#include <QNEthernet.h>

using namespace qindesign::network;

// The IP address info will be dependent on your local network
// First 3 numbers must match router, last must be unique
//
IPAddress ip{10, 0, 0, 12};   // Unique IP
IPAddress sn{255,255,255,0};  // Subnet Mask
IPAddress gw{10,0,0,1};       // Default Gateway
// Initialize the Ethernet server library with the IP address and port
// to use.  (port 80 is default for HTTP):
EthernetServer server(80);
//===============================================================================
//  Initialization
//===============================================================================
void setup() {
  Serial.begin(115200);
 // Initialize the library with a static IP so we can point a webpage to it
  if (!Ethernet.begin(ip,sn,gw)) {
    Serial.println("Failed to start Ethernet\n");
    return;
  }

  // Just for fun we are going to fetch the MAC address out of the Teensy
  // and display it
  uint8_t mac[6];
  Ethernet.macAddress(mac);  // Retrieve the MAC address and print it out
  Serial.printf("MAC = %02x:%02x:%02x:%02x:%02x:%02x\n",
         mac[0], mac[1], mac[2], mac[3], mac[4], mac[5]);

  // Show whether a cable is plugged in or not.
  Ethernet.onLinkState([](bool state) {
    Serial.printf("[Ethernet] Link %s\n", state ? "ON" : "OFF");
  });

  // start the webserver
  server.begin();
  Serial.print("server is at ");
  Serial.println(Ethernet.localIP());

}
//===============================================================================
//  Main
//===============================================================================
void loop() {
 // listen for incoming clients
  EthernetClient client = server.available();
  if (client) {
    Serial.println("new client");
    // an http request ends with a blank line
    boolean currentLineIsBlank = true;
    while (client.connected()) {
      if (client.available()) {
        char c = client.read();
        Serial.write(c);
        // if you've gotten to the end of the line (received a newline
        // character) and the line is blank, the http request has ended,
        // so you can send a reply
        if (c == '\n' && currentLineIsBlank) {
          // send a standard http response header
          client.println("HTTP/1.1 200 OK");
          client.println("Content-Type: text/html");
          client.println("Connection: close");  // the connection will be closed after completion of the response
          client.println("Refresh: 5");  // refresh the page automatically every 5 sec
          client.println();
          client.println("<!DOCTYPE HTML>");
         // Start HTML output to be displayed
          client.println("<html>");
          client.println("Teensy 4.1 WebServer<br />");
          // output the voltage value of each analog input pin
          for (int analogChannel = 0; analogChannel < 6; analogChannel++) {
            int sensorReading = analogRead(analogChannel);
            // Convert reading to volts
            float volts = sensorReading * 3.3 / 1024.0;
            client.print("analog input ");
            client.print(analogChannel);
            client.print(" is ");
            client.print(volts);
            client.println("V<br />");
          }
          client.println("</html>");
          break;
        }
        if (c == '\n') {
          // you're starting a new line
          currentLineIsBlank = true;
        } else if (c != '\r') {
          // you've gotten a character on the current line
          currentLineIsBlank = false;
        }
      }
    }
    // give the web browser time to receive the data
    delay(1);
    // close the connection:
    client.stop();
    Serial.println("client disconnected");
  }
}
Since we need to be able to point the web browser window to the Teensy web server we are creating, we need to use a static IP address that we can type in to the address bar of the web browser rather than letting DHCP automatically assign one for us.
The IP address needs to match the address range of your network. To determine the correct values to use, open a command prompt by typing ‘cmd‘ into the Windows search bar. This will open a black Command Prompt window. Type ‘ipconf‘ at the prompt in the window and hit Enter.
Information on the wired and wireless Ethernet connections of the computer will be displayed. In our case, we are using Wi-Fi to connect our computer to the network and you will see a few entries that look similar to the following.
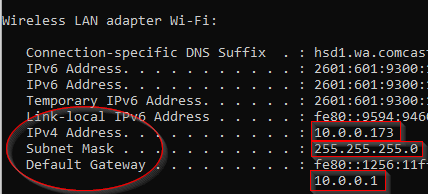
You will find an item IPv4 Address which is the IP address of your computer on the local network. In our example here the computer IP address is 10.0.0.173
In the program, you will need to set the IPAddress ip for the Teensy 4.1 to match the same first 3 numbers (10.0.0) in our example. The numbers need to be separated by commas rather than periods. The 4th number can be set to anything between 0-255 but needs to be unique on your network. We are using 12 in our example.
Similarly set the Subnet Mask for the Teensy 4.1 in IPAddress sn to match your Subnet Mask, also using commas. In our case it was 255.255.255.0.
Lastly, set the Default Gateway for the Teensy 4.1 in IPAddress gw to match your Default Gateway again using commas. In our case it was 10.0.0.1.
IPAddress ip{10, 0, 0, 12};   // Unique IP
IPAddress sn{255,255,255,0};  // Subnet Mask
IPAddress gw{10,0,0,1};       // Default Gateway
Now when we initialize the library with Ethernet.begin(); we will specify these parameters so that we have a known static IP address that we can point a web browser to. In this program, we are also testing the return value to make sure that the Ethernet library started up properly.
 // Initialize the library with a static IP so we can point a webpage to it
  if (!Ethernet.begin(ip,sn,gw)) {
    Serial.println("Failed to start Ethernet\n");
    return;
  }
With those tweaks, we can now download the complete modified program into the Teensy 4.1 and also make sure you have the network cable attached.
In your favorite web browser like Chrome, Firefox or Edge, open a new tab and type the web server address into the address bar. In our case it is 10.0.0.12. You should see something similar to this.
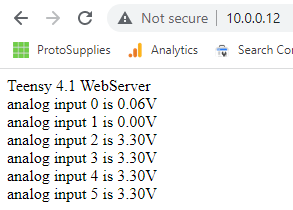
The webpage will automatically refresh every 5 seconds and update these values.
If the Teensy 4.1 is on the Prototyping System baseboard like it is in our case, analog inputs 0 and 1 are free floating and reading close to 0 volts. Analog inputs 2 thru 5 are also used for I2C so those pins have 2.2K pullup resistors and will show 3.30V or something very close to that. You can jumper one of the pins to gnd or 3.3V to check that it changes state. Note: Do not connect any input to VIN/5V or it will damage the Teensy.
The main loop() listens for incoming clients to serve. If we detect a client connection request, we need to process the request while looking for a blank line with a newline character at the end. If this is true, we send a response back to the browser window.
A while loop is used to process each character received from the client. It checks the character value which is stored in a char variable called c to determine if it is a newline character ‘\n’. If true and there are no characters in the line, then we set a variable called currentLineIsblank to true.
When the while loop detects a newline character and the currentLineIsBlank is true, it then generates a response to the browser window. On completion of the response, it breaks the while loop and then closes the connection.
To send information back to the web browser window, client.println statements are used to send text strings. This includes some standard response header statements that the browser window expects to see.
HTTP/1.1 200 OK tells the browser that the browser request was successful. We also tell the browser that the response is text/html using the Content-Type: text/html header. We use Refresh: 5 to tell the browser to reconnect to the Teensy 4.1 every 5 seconds to read the data again.
The statements between client.println(“<html>”); and client.println(“</html>”); are HTML statements being passed to the the browser window for display. The “<br />” is used to insert a line break.
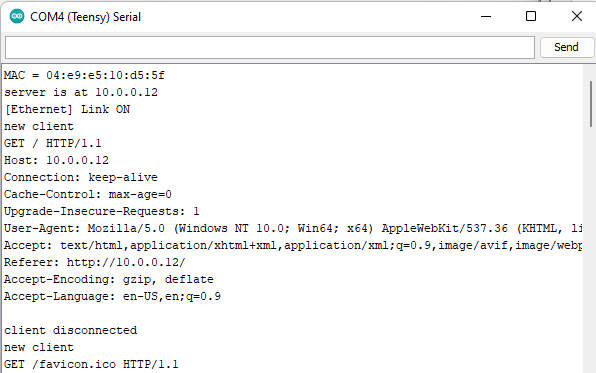
If you open the Serial Monitor window, you will see something similar to what is shown below. The program first reports the MAC address of the Teensy 4.1, then shows the static IP address that we are using and also shows the link status. It will also report when a new client tries to connect.
The rest of the information that gets repeated every 5 seconds is the information that comes in from the web browser and read using c = client.read(); and is being echo’d to the Serial Monitor window by Serial.write(c); before being processed.
Going Further….
You can try modifying, adding or deleting statements in the HTML area to see the effect. If you know at least a little bit about HTML, you can try more advanced things like changing the font color.
If you have the Audio Tutorial Adapter, you can plug it in and twiddle the potentiometers to see the values change in the web browser window on A1, A2 and A3.
You can also try attaching a sensor such as a temperature sensor or humidity sensor and report the reading to the browser window.
Try downloading some of the more advanced example programs that come with the QNEthernet library.

